 Printing ovulation calendar Printing ovulation calendar
The easiest way to print the ovulation calendar is to click the  button on the main window's toolbar. You will get the same number of months printed as you had printed the last time (originally one). Month size, position on the page, legend and margin settings are also defined by the settings you used the last time. To change those settings, use the button on the main window's toolbar. You will get the same number of months printed as you had printed the last time (originally one). Month size, position on the page, legend and margin settings are also defined by the settings you used the last time. To change those settings, use the  button, which will open the print-preview window: button, which will open the print-preview window:
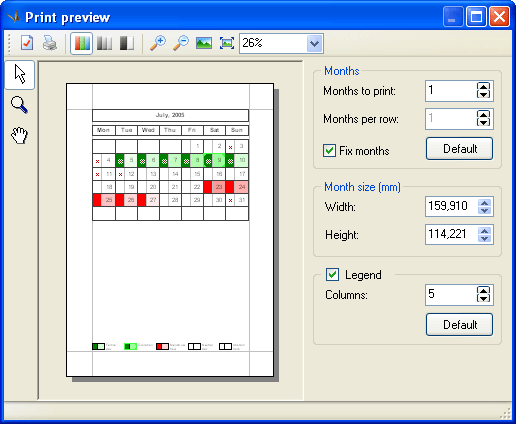
The window has two toolbars (at the top and at the left) and a settings bar (at the right).
The  button on the toolbar at the top opens the page settings window, where you
can select a printer, orientation of the page, edit margins. The
button on the toolbar at the top opens the page settings window, where you
can select a printer, orientation of the page, edit margins. The  button simply sends current page to printer. The next three buttons -
  , ,  ,
and ,
and  - allow
you to select the image color scheme: color, greyscale, and black-and-white,
respectively. The next group of buttons affects calendar scale. The - allow
you to select the image color scheme: color, greyscale, and black-and-white,
respectively. The next group of buttons affects calendar scale. The  and
and  buttons
enlarge or reduce image size respectively. The buttons
enlarge or reduce image size respectively. The  button sets scale to 1:1, and the
  one sets scale to make sure the image fits the page. Also, you can select a
predefined scale on the drop-down list or enter a custom scale value. When
the window opens, the scale is always set to "fit to page".
one sets scale to make sure the image fits the page. Also, you can select a
predefined scale on the drop-down list or enter a custom scale value. When
the window opens, the scale is always set to "fit to page".
Buttons on the toolbar at the left set ovulation calendar mode:
| Icon |
Description |
|
Edit object mode. In this mode, you can select or edit size of such
objects as legend or group of months. To select an object to be
edited, simply click on it or or click over a blank area on the sheet
and then "drag" the selection rectangle over the objects to be
selected while holding the left mouse button down. Eight black
rectangles appear around each selected object. Click on one of the
rectangles and drag them while holding the mouse button down to resize
the object. |
|
Edit scale mode. In this mode, you can just click on the page area to
enlarge it or hold the Ctrl key down and click on the page area to make
it smaller. |
|
View page mode. Allows dragging page by "point". Just click
on any area on the page and drag it while holding the mouse button down.
The preview area will move as well. |
The settings bar at the right contains the following three sections:
Month settings. The "Months to print"
value sets the total number of months to appear on page, while the "Months
per row" - sets the number of months to appear in each "row"
of the months table (cannot exceed the total number). The "Fix months"
flag (enabled by default) fixes position and size of a group of months
regardless to legend. If the flag is disabled, the group of months will
move and occupy the maximum area available on page when the legend size is
moved or edited. The "Default" button also forces the optimum
position and size for a group of months on the maximum area available on
page.
Month size. Contains
current width and height values for each month in units you have set in
the program. The values can be set and edited by user.
Legend. The checkbox in the title
allows enabling or disabling the legend object on page. The "Columns"
value contains the number of columns to appear in the legend table. The
total number of legend items depends on the goal
you have selected for your ovulation calendar. The "Default" button will
force the optimum position and size for legend on page.
After you have got the desired appearance of your page, you can simply
send it to printer by clicking the
button on the toolbar. In any case, the program will remember current
position and size for group of months and legend after you have closed the
window and will use these settings for printing the next time.
|
